
Complete chandelier parts checklist covering crystals, hardware, connections, and tools. Learn to measure, source, and install authentic components for safe, beautiful repairs.
You’ve found the perfect vintage chandelier at an estate sale, but three crystals are missing and the mounting chain looks unsafe. Or maybe your family heirloom suddenly has a loose arm and cloudy prisms. Mismatched or failing chandelier parts can turn an elegant fixture into an eyesore. This detailed checklist walks you through identifying, measuring, and sourcing every component you need for confident repair or upgrade, ensuring your chandelier sparkles safely for years.
Key Takeaways
| Point | Details |
|---|---|
| Checklist Organization | Separate parts into crystals, hardware, framing, and mounting categories with precise measurements for each. |
| Connection Compatibility | Match exact connection styles like pins, jump rings, or octagon chains to prevent repair failure and loose fittings. |
| Safety Requirements | Load-bearing hardware must be proof-tested at 150% to 200% of fixture weight to ensure secure mounting. |
| Essential Tools | Use pliers, wire strippers, voltage testers, and stable ladders for safe assembly and maintenance work. |
How to Choose the Right Chandelier Parts: Selection Criteria
Before you order a single crystal or chain link, you need a clear framework for choosing compatible components. Chandelier parts fall into four main categories: crystals (the decorative prisms and drops), hardware (pins, rings, and bobeches that hold crystals), framing (arms, finials, and backplates providing structure), and mounting (chains, rods, and canopies that bear the fixture’s weight).
Precision matters more than you might expect. A crystal octagon measuring 1.5 inches won’t hang properly in a hole drilled for 1.25 inches. A pin gauge off by even a fraction leaves crystals loose or unable to attach. Record exact measurements of hole diameters, pin thickness, and chain link dimensions before shopping.
Connection style compatibility is equally critical. Your chandelier likely uses one of three systems: twist or clasp pins that lock into drilled holes, jump rings that slip through crystal loops, or octagon chains that link multiple crystals in a cascade. Mixing these chandelier connection styles guarantees frustration and unstable results.
Authenticity preserves the brilliance you’re trying to restore. Generic acrylic “crystals” lack the refractive clarity of genuine leaded glass or Swarovski crystal. They yellow over time and scatter light unevenly. Invest in quality materials from reputable suppliers to maintain sparkle.
Safety cannot be compromised on mounting hardware. Load-bearing chandelier chains and suspension rods must be tested at 1.5 to 2 times fixture weight for safety. A 20-pound chandelier demands hardware rated for at least 30 pounds. Skimping here risks injury and property damage.
Pro Tip: Photograph your chandelier from multiple angles before disassembly. These reference images help you remember original crystal placement patterns and connection orientations during reassembly.
Essential Chandelier Parts to Know
Understanding the specific parts you’re working with transforms vague “I need crystals” into precise “I need 24 octagon crystals, 1.5 inches, with 14mm holes and pin connections.” Let’s break down each category.
Crystals provide the signature sparkle and come in distinct shapes:
- Octagons: Eight-sided flat crystals that catch light from multiple angles, commonly used in tiers
- Pendalogue drops: Teardrop-shaped crystals with elegant taper, often hung as outer decorations
- Teardrops: Rounded drops that create romantic, softer light diffusion
- Beads: Small spherical or faceted crystals threaded onto wire or chain for delicate accents
- Rosettes: Flower-shaped crystals that add dimensional texture at connection points
Hardware secures everything together. Twist and clasp pins insert through crystal holes and lock with a quarter turn. Jump rings, small metal loops, slip through crystal eyelets for quick attachment. Bobeches are decorative saucers that sit beneath candle cups or bulb sockets, catching drips and adding visual weight. A bent or broken bobeche diminishes stability and appearance and requires exact size replacement to maintain chandelier symmetry.
Framing parts create the chandelier skeleton. Arms extend from the central column to hold lights and crystals. Finials cap the top or bottom, providing decorative endpoints. Backplates mount against the ceiling, concealing electrical boxes and providing finished appearance.
Mounting components bear the entire load. Chains or rods suspend the fixture from ceiling structure. Canopies cover junction boxes. Ceiling boxes anchor into joists to support weight. Every piece must be rated appropriately.
When you know these crystal chandelier parts by name and function, you can create a comprehensive parts checklist specific to your fixture. Consult a detailed chandelier parts catalog to identify unusual vintage components.
Comparison of Common Chandelier Connection Styles
Choosing the wrong connection type wastes money and creates safety hazards. Each style has specific advantages and limitations.
| Connection Style | Best For | Advantages | Limitations |
|---|---|---|---|
| Twist/Clasp Pins | Heavy crystals, permanent installations | Extremely secure, withstands vibration | Requires exact pin gauge match, harder to remove |
| Octagon Chains | Modular tier designs, cascading arrangements | Easy replacement, flexible positioning | Can tangle, requires careful spacing |
| Jump Rings | Light crystals, quick repairs | Simple installation, widely available | Can loosen over time, needs periodic tightening |
Pins provide the most secure closure, ideal for heavier octagon crystals or high-traffic areas where vibration occurs. The pin shaft must match the crystal hole diameter precisely. Too thin and crystals wobble; too thick and you’ll crack the crystal forcing it.
Octagon chains create beautiful cascading effects and simplify repairs. If one crystal breaks, you unclip the damaged piece and snap in a replacement without disturbing surrounding elements. This modular approach makes maintenance faster.
Jump rings offer maximum flexibility and forgiving installation. You open the ring with pliers, thread it through the crystal eyelet and chandelier loop, then close it. However, vibration from doors, HVAC systems, or ceiling fans can gradually work jump rings open. Inspect them annually.
Matching your original chandelier’s connection style isn’t optional. Mixing types creates uneven weight distribution, visual inconsistency, and potential failure points. Study your existing connections closely or reference manufacturer documentation before ordering. Review this comparison of chandelier connections for visual identification help.
Ordering and Sourcing Tips for Authentic Parts
Precise measurement and verification prevent costly returns and project delays. Follow these steps for accurate sourcing.
- Measure hole diameters with digital calipers to 0.1mm accuracy. Standard rulers lack the precision needed for chandelier parts.
- Determine pin gauge by testing fit with existing pins or measuring shaft diameter directly.
- Count chain links and measure individual link dimensions including interior opening width.
- Record finish details such as polished brass, antique bronze, or chrome to maintain visual consistency.
- Photograph any unusual vintage components from multiple angles to share with suppliers for identification.
- Verify load ratings on all mounting hardware, confirming certification for at least 150% of chandelier weight.
Prefer suppliers specializing in authentic crystals and certified hardware. Crystal Place sources directly from established manufacturers, ensuring you receive genuine materials with proper quality control. Generic marketplace sellers often substitute lower-grade materials that compromise appearance and safety.
Avoid “close enough” thinking. A crystal 2mm smaller than the original creates visible gaps. A pin 0.5mm too thin allows wobble that damages crystal holes over time. Exactness preserves both function and aesthetics.
Pro Tip: Order one extra of each part type beyond your immediate needs. Having spares on hand means future repairs take minutes instead of waiting for shipping. Store extras in labeled compartments to prevent loss.
Learn precise chandelier part measurement techniques and apply strategies for buying chandelier parts reliably to avoid common ordering mistakes.
Tools and Accessories Needed for Chandelier Repair and Assembly
Having proper tools transforms chandelier work from frustrating puzzle to satisfying craft. Gather these essentials before starting.
Standard hand tools form your foundation:
- Needle-nose pliers for manipulating jump rings and small hardware in tight spaces
- Wire strippers for preparing electrical connections during rewiring
- Flathead and Phillips screwdrivers in multiple sizes for various mounting screws
- Adjustable wrench for securing threaded rods and canopy nuts
- Digital calipers for precise measurement of holes, pins, and chain links
Safety equipment protects you during electrical work and elevated assembly. A non-contact voltage tester confirms power is off before touching wiring. Never trust circuit breakers alone; always verify. Use a sturdy step ladder rated for your weight plus tool load, positioned on level flooring. Avoid chairs or makeshift platforms.
Replacement bulbs matching the fixture’s specifications prevent overheating and electrical issues. Check maximum wattage ratings stamped on sockets. LED bulbs reduce heat output while providing equivalent light, extending crystal clarity by minimizing heat damage.
Cleaning supplies restore brilliance after repairs. Use chandelier-specific spray cleaners that evaporate without residue. Microfiber cloths prevent scratching. Avoid ammonia-based products that can cloud certain crystal coatings.
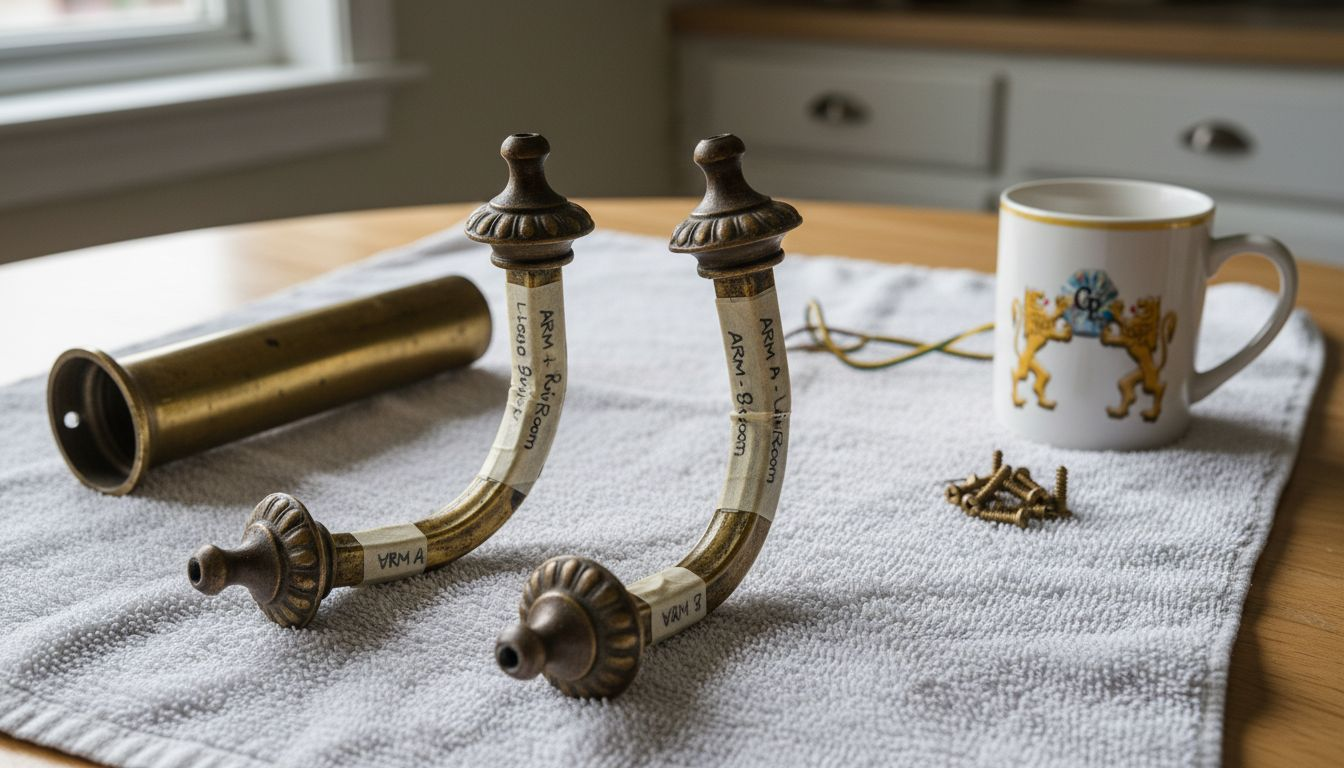
Pro Tip: Create a dedicated workspace with good overhead lighting and a soft surface like a towel-covered table. This prevents crystal damage from drops and makes small parts easier to see. Magnetic parts trays keep screws and pins organized.
Prepare your tools for chandelier repair in advance to avoid mid-project trips to the hardware store. Regular maintenance and gentle cleaning prolong chandelier brilliance and function for decades.
Summary Comparison Table of Chandelier Parts
| Part Category | Examples | Connection Types | Best Use | Sourcing Tips |
|---|---|---|---|---|
| Crystals | Octagons, pendalogues, teardrops, beads, rosettes | Pins, octagon chains, jump rings | Decorative sparkle, light refraction | Measure hole diameter and depth; match original shape |
| Hardware | Twist pins, clasp pins, jump rings, bobeches | Direct attachment | Securing crystals to frame | Verify pin gauge; test fit before bulk orders |
| Framing | Arms, finials, backplates, center columns | Threaded connections, set screws | Structural support, aesthetic design | Match finish and style exactly; photograph originals |
| Mounting | Chains, rods, canopies, ceiling boxes | Load-bearing rated connections | Weight support, electrical housing | Confirm load rating at 150%+ fixture weight |
This table consolidates the key decision factors for each part category. Reference it when creating your specific chandelier checklist, ensuring you address connection compatibility, safety requirements, and aesthetic consistency across all components. Each category demands different sourcing priorities, from precise measurement for crystals to safety certification for mounting hardware.
Situational Recommendations: Choosing Parts for Your Specific Needs
Different repair and upgrade scenarios require tailored approaches. Apply the checklist strategically to your situation.
-
Single crystal replacement: Measure the damaged crystal precisely and identify its exact connection type. Order one replacement plus one spare. Match the original shape and size exactly to prevent visual inconsistency. Follow guidance for single crystal replacement to avoid measurement errors.
-
Complete tier restoration: When multiple crystals on one tier are damaged or missing, order a full matching set. Mixing old and new crystals creates color variation as older pieces may have yellowed. Complete sets ensure uniform sparkle and appearance. Reference tier restoration best practices for proper installation sequence.
-
Sparkle upgrade: Replace all existing crystals with premium authentic Swarovski versions for dramatically enhanced clarity and light refraction. The investment transforms a dull fixture into a showpiece. Learn about upgrading with authentic crystals to understand quality differences and value.
-
Hardware refresh: Damaged pins, bent jump rings, or tarnished bobeches compromise both function and appearance. Replace all visible hardware in matching finish. This coordinated approach delivers professional results and prevents future failures from aged components.
-
Safety upgrade: If mounting chains show rust, kinks, or wear, replace the entire suspension system with properly rated hardware. Never attempt partial chain repairs on load-bearing components. Full replacement with certified parts ensures continued safe operation.
Following these situational strategies reduces repair errors, prevents mismatched results, and ensures your chandelier functions safely while looking its absolute best.
Elevate Your Crystal Chandelier with Authentic Parts from Crystal Place
Now that you understand exactly which parts your chandelier needs and how to measure them correctly, sourcing authentic components becomes straightforward. Crystal Place offers an extensive selection of genuine Swarovski crystals, certified mounting hardware, and precision-matched chandelier accessories. Whether you’re replacing a single damaged prism or restoring an entire vintage fixture, you’ll find quality-tested parts designed for lasting brilliance and safe operation.

Shop confidently with detailed specifications, expert guidance, and free shipping on orders over $22. Use your new checklist knowledge to choose authentic Swarovski chandelier prisms matched to your fixture’s style, browse premium Swarovski crystal balls for dramatic focal points, or reference the complete chandelier parts checklist for comprehensive restoration planning.
FAQ
What are the most common chandelier crystal shapes?
Common shapes include octagons, pendalogue drops, teardrops, beads, and rosettes. Octagons are flat eight-sided crystals ideal for tiers, while pendalogues create elegant hanging accents. Each shape produces distinct light refraction patterns and aesthetic effects.
How do I measure chandelier parts for accurate replacement?
Use digital calipers to measure hole diameters, pin gauges, and chain link dimensions to 0.1mm precision. Record every measurement including crystal length, width, and thickness. Reference photos help confirm shape and connection style. Learn detailed techniques for measuring chandelier crystals accurately to eliminate guesswork.
Can I mix different connection styles when repairing a chandelier?
No, mixing connection styles like pins, jump rings, and octagon chains creates poor fit, visual inconsistency, and potential safety issues. Each system distributes weight differently and requires specific installation techniques. Always match your original chandelier’s connection method exactly for secure, professional results.
What tools do I need to repair or upgrade a crystal chandelier?
Essential tools include needle-nose pliers, wire strippers, screwdrivers, digital calipers, and an adjustable wrench. Safety equipment like non-contact voltage testers and a stable step ladder rated for your weight prevents accidents. Keep microfiber cloths and chandelier cleaner on hand for final polishing after assembly.
Recommended
- Chandelier Parts Checklist That Prevents Mistakes – CrystalPlace
- 7 Steps to a Complete Crystal Chandelier Checklist – CrystalPlace
- 7 Chandelier Restoration Techniques That Work – CrystalPlace
- Chandelier Arm Replacement Parts That Actually Fit – CrystalPlace