
Transform your chandelier with expert workflows for chandelier repair. This DIY guide covers everything from tools to maintenance for stunning results!
TL;DR:
- Regular chandelier maintenance, including cleaning and inspections, ensures longevity and safety. Proper repair workflows, thorough documentation, and matching parts restore beauty and functionality effectively. When in doubt, professional electrical assessments protect both your fixture and home safety.
A chandelier that dims, flickers, or loses crystals isn’t just an eyesore. It’s a fixture quietly losing value, safety, and the light that made your room feel alive. Getting it back to full brilliance takes more than swapping a bulb. The right workflows for chandelier repair make the difference between a fixture that looks restored and one that actually is. This guide walks you through every stage, from tools and safety prep to disassembly, cleaning, troubleshooting, and long-term maintenance, so you finish the job with confidence.
Key takeaways
| Point | Details |
|---|---|
| Preparation prevents mistakes | Gather all tools, replacement parts, and safety gear before you touch the fixture. |
| Disassemble in sequence | Work top-down and label everything to make reassembly fast and accurate. |
| Clean before you repair | Dirt and residue hide cracks, loose pins, and corroded contacts that matter during repair. |
| Troubleshoot by symptom | Match flickering, buzzing, or crooked arms to specific causes before replacing parts. |
| Schedule ongoing maintenance | Regular inspection and cleaning protect your investment far longer than a single repair session. |
Workflows for chandelier repair: tools, materials, and safety first
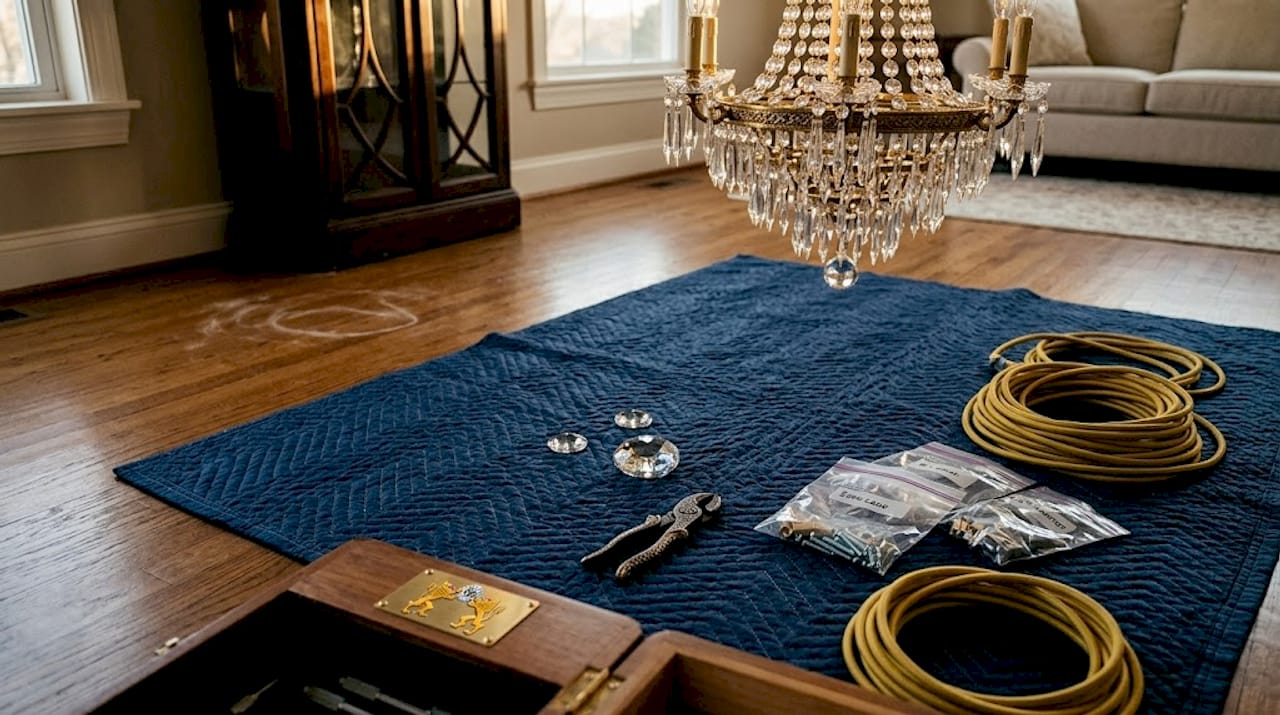
Before you climb a ladder or loosen a single screw, you need everything within reach. Stopping mid-repair to hunt for a tool is how crystals get dropped and wires get left exposed. Treat your supply setup as part of the repair workflow itself.
What to have on hand
- Screwdrivers (flathead and Phillips, multiple sizes)
- Needle-nose pliers for bending and connecting wire links
- Wire strippers and connectors for any rewiring work
- Soft lint-free cloths and a mild chandelier cleaning solution
- Replacement crystals, pins, and bobeches matched to your fixture
- Ladder rated for your ceiling height
- Voltage tester to confirm the power is actually off
- Camera or phone to photograph the fixture before disassembly
Understanding chandelier parts like arms, pendalogues, bobeches, and pins matters because you cannot order the right replacement if you do not know what you are replacing. Take time to identify your fixture’s components before purchasing anything.
| Item | Why you need it |
|---|---|
| Voltage tester | Confirms power is off before you touch wiring |
| Replacement crystals | Restores visual completeness and light refraction |
| Needle-nose pliers | Manipulates small pins and wire links without breaking them |
| Soft cloths | Cleans crystals without scratching the surface |
| Camera | Documents original layout so reassembly is accurate |
Pro Tip: Take photos from at least three angles before removing a single crystal. This reference alone will save you an hour during reassembly.
Safety is non-negotiable. Turn off the chandelier at the switch, then cut power at the breaker. Use your voltage tester to double-check before touching any wire. Wear cotton gloves to protect both your hands and the crystals from skin oils that dull their brilliance over time.
The step-by-step repair workflow
This is where preparation pays off. A clear sequence keeps you from repeating steps or, worse, reassembling a fixture with a problem still inside it.
-
Cut power and confirm it at the breaker. Never rely on the wall switch alone. Removing chandeliers safely starts with turning off power and carefully detaching the fixture from the ceiling.
-
Photograph the full fixture. Capture the crystal arrangement, wire routing, and arm positions. You will thank yourself later.
-
Remove crystals in organized batches. Work section by section, placing crystals into labeled zip-lock bags or a segmented tray. This is not optional. Mixed crystals create a puzzle you do not want to solve at the end of a long repair session.
-
Detach arms and canopy. Lower the fixture or work on a padded surface below. Avoid letting the chandelier hang freely while you work on it.
-
Inspect every component. Look for cracked crystals, bent or missing pins, corroded sockets, frayed wires, and loose arm connections. Crystal components like pins and bobeches are common failure points that go unnoticed until you look closely.
-
Clean the crystals before repair. Vintage or antique pieces need special attention. Antique chandeliers require gentle cleaning with dry methods and minimal dampness to avoid damaging finishes or historic value. For modern crystal, a diluted cleaning solution on a lint-free cloth works well. Check out this step-by-step crystal repair guide for details on cleaning without scratching.
-
Clean the metal frame. Use a soft dry cloth on the arms and canopy. Avoid abrasive cleaners that strip finishes or leave residue in joints.
-
Rewire if needed. DIY rewiring of antique chandeliers is possible with the right skills, but professional help is recommended when you are not confident with electrical work. If you proceed, use wire strippers to expose fresh copper, connect securely, and cap every joint.
-
Replace damaged parts. Matched replacement crystals restore both beauty and structural integrity. Order parts specific to your chandelier model to avoid mismatched sizes or hole diameters.
-
Reassemble using your photos as a reference. Start at the top and work down, reattaching arms before hanging crystals. Use pliers to close crystal pins fully so nothing falls loose after you restore power.
-
Restore power and test. Turn the breaker back on, check all sockets, and look for any lights that do not respond.
Pro Tip: Lay a moving blanket on the floor under the chandelier while you work. It catches dropped crystals before they shatter and gives you a clean surface to organize parts.
Troubleshooting common chandelier problems
Even a careful repair workflow hits snags. Knowing what causes specific symptoms saves you from replacing parts that were never the problem.
- Flickering lights: Usually a loose bulb, a failing socket, or a poor wire connection. Electrical issues like flickering indicate the need for immediate disconnection and professional assessment if the cause is not obvious from a visual check.
- Buzzing sound: Often tied to incompatible dimmer switches. Not all bulbs work with all dimmers. Try swapping in a dimmable LED rated for your fixture before pulling wiring apart.
- Crooked or sagging arms: Check the joint screws that connect arms to the central frame. These loosen over years of vibration and thermal expansion. Tightening them takes two minutes and fixes the problem completely.
- Missing or broken crystals: Broken crystals can be replaced with matched parts. Do not substitute different crystal sizes or shapes. The light pattern your fixture creates depends on precision placement.
- Corroded sockets: Replace the socket entirely rather than cleaning it. Corroded metal does not conduct reliably, no matter how well you polish it.
One of the most common mistakes in DIY chandelier repair is skipping the inspection phase and going straight to replacement. You spend money on parts you do not need, and the actual problem stays hidden.
When in doubt about electrical faults, call a licensed electrician. A professional inspection costs far less than a house fire or a fixture that falls from the ceiling.
Know when to stop. If you find brittle cloth-wrapped wiring, severe corrosion inside the canopy, or a mounting bracket that moves when it should not, those are signals to bring in a professional. Some repairs protect the fixture. Others protect your home.
Post-repair verification and ongoing maintenance
Finishing the repair is not the finish line. Verifying your work and building a maintenance habit are what separate chandeliers that last decades from ones that need repair again in six months.
Verification checklist after every repair
Run through these before you call the job done:
- All bulbs light up at full brightness with no flicker
- Dimmer switch (if present) works smoothly across its full range
- Every crystal pin is fully closed and no crystal moves when you gently touch it
- Arms are level and the canopy sits flush against the ceiling
- No visible frayed wires or exposed copper anywhere
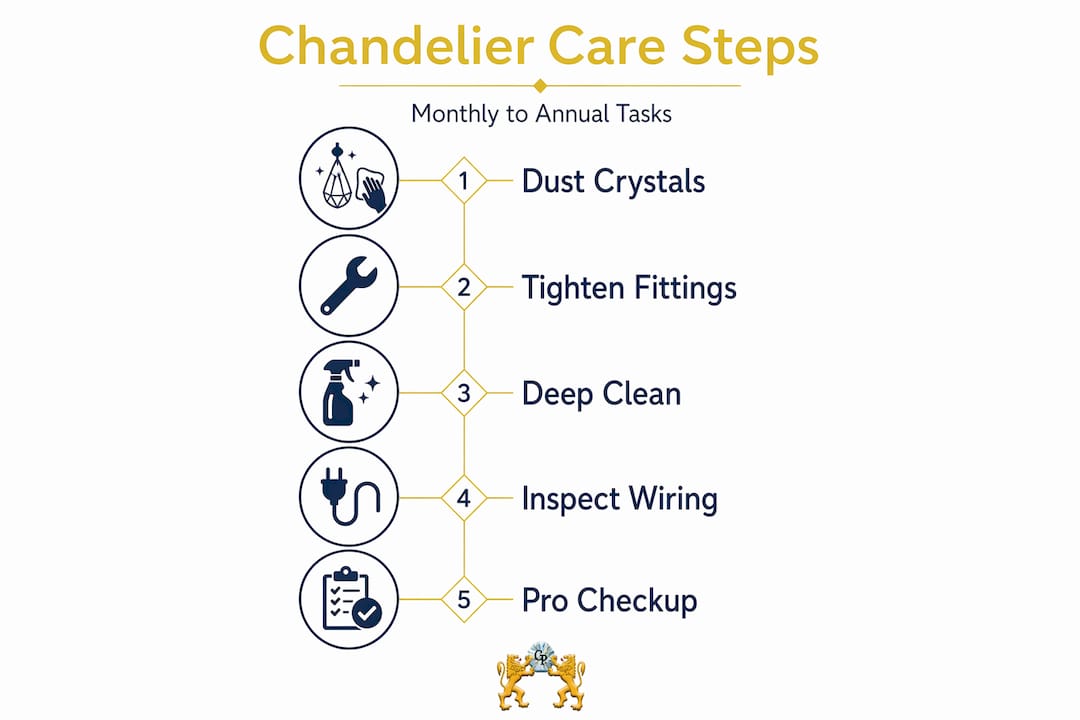
Building a maintenance schedule
| Task | Frequency |
|---|---|
| Dust crystals with soft cloth or brush | Monthly |
| Full crystal cleaning with solution | Every 6 months |
| Inspect pins, bobeches, and arms for wear | Every 6 months |
| Check and tighten all mounting hardware | Annually |
| Professional electrical inspection | Annually |
Regular crystal inspection for damage or looseness keeps chandeliers at their best, and contacting your supplier early for replacements avoids long gaps with missing pieces. A chandelier maintenance checklist built into your calendar takes fifteen minutes twice a year and prevents most of what sends people back up the ladder for repairs.
Annual professional inspections help catch wiring or structural issues before they become hazards. Even confident DIYers benefit from a licensed electrician reviewing the wiring every year or two, especially on fixtures installed before 2010.
Pro Tip: Store a small bag of replacement pins, wire, and crystals specific to your fixture in a labeled zip-lock bag. When you need them at 9 PM, they are already there.
My honest take on DIY chandelier repair
In my experience, the biggest mistake homeowners make is treating chandelier repair like a home improvement project rather than a precision restoration task. I have seen people rush through disassembly without a single photo, spend two hours figuring out where 40 crystals go, and then quit before checking their wiring. The result is a fixture that looks okay from ten feet away and is a hazard from six inches.
What I have learned is that the workflow matters more than the tools. You can do excellent work with basic supplies if you follow a logical sequence. You can also make an expensive mess with a full toolkit and no plan. The crystal chandelier restoration process is genuinely satisfying when you approach it methodically. There is a real reward in seeing a grimy, dim fixture throw light across a ceiling again.
My advice: give yourself more time than you think you need, treat the inspection phase as seriously as the repair phase, and do not touch wiring unless you are genuinely comfortable with it. The crystals are forgiving. The electricity is not.
— BCC
Get the right parts from Crystalplace

Crystalplace has been supplying authentic crystal components since 1991, and it shows in both the product quality and the depth of their repair resources. Whether you need pendalogues in a specific size, replacement bobeches, or Swarovski-grade prisms to match an existing fixture, you will find them in the crystal chandelier collection. Orders over $22 ship free across the USA, which matters when you are ordering small parts that add up fast. Beyond the products, Crystalplace publishes detailed restoration guides and maintenance tutorials that go far deeper than a single article can. If you are serious about restoring your chandelier to its original brilliance, start with the right supplier.
FAQ
What tools do you need to start chandelier repair?
You need screwdrivers, needle-nose pliers, a voltage tester, soft cloths, and replacement parts specific to your fixture. A camera for documenting the layout before disassembly is also worth having.
How do you safely remove a chandelier for repair?
Turn off the breaker, confirm power is off with a voltage tester, then carefully detach the fixture from the ceiling mounting bracket. Work with a second person whenever the fixture weighs more than a few pounds.
When should you call a professional instead of doing DIY repair?
Call a licensed electrician if you find frayed or cloth-wrapped vintage wiring, flickering that persists after basic troubleshooting, or a mounting bracket that is loose or moving. Electrical faults require immediate disconnection and professional assessment.
How often should you clean and inspect a chandelier?
Dust crystals monthly, do a full cleaning every six months, and schedule a professional electrical inspection annually. Regular inspections catch loose pins and corroded sockets before they become bigger problems.
Where can you find replacement crystals for a chandelier?
Matched replacement parts are available from specialty crystal suppliers. Using parts designed for your specific chandelier model maintains both the visual aesthetic and structural integrity of the fixture.
Recommended
- Crystal Chandelier Repair 2026: 95% Satisfaction Guide – CrystalPlace
- Step-by-Step Chandelier Maintenance for Lasting Brilliance – CrystalPlace
- 7 Chandelier Restoration Techniques That Work – CrystalPlace
- What Is Chandelier Repair: Restoring Brilliance Safely – CrystalPlace