

Unlock the beauty of light with our crystal prism arrangement guide. Transform dull spaces into vibrant, sparkling environments effortlessly!
TL;DR:
- Crystal prisms transform dull lighting into vibrant displays of rainbow reflections that elevate room ambiance. Proper arrangement, including measurement, spacing, and cleaning, is essential to maximize their dazzling effect and avoid common mistakes. Experimentation and adjustment based on specific room variables are key to achieving stunning, dynamic lighting results.
Most homes have perfectly good light fixtures but flat, uninspiring light. The bulbs work, the chandelier hangs straight, but nothing in the room sparkles or catches the eye. Crystal prisms change that equation entirely. Hanging even a modest cluster of quality prisms near a light source fills a room with dancing rainbow reflections and dramatically shifts the mood. This guide walks you through everything you need, every step of the arrangement process, and every mistake to avoid so your space gets the full effect these beautiful pieces can deliver.
Key Takeaways
| Point | Details |
|---|---|
| Choose the right prism | Faceted, high-clarity crystal prisms maximize light refraction and brilliance in residential spaces. |
| Arrange for optimal effect | Spacing and placement directly impact the lighting and visual ambiance created by crystal prisms. |
| Maintain brilliance | Regular cleaning and maintenance keep crystal prisms shining and your room’s lighting vibrant. |
| Troubleshoot placement | Even small adjustments or corrections can transform the effect and beauty of your arrangements. |
| Experiment to improve | Testing arrangements in different lighting conditions leads to the best results for your home. |
Essential tools and materials for crystal prism arrangement
Now that you understand the value of crystal prisms, let’s make sure you’re equipped for a flawless arrangement.
Before you hang a single prism, gather your materials. Rushing into placement without the right hardware leads to uneven spacing, dropped crystals, or holes in your ceiling you didn’t plan for. Taking 30 minutes to prepare saves hours of frustration later.
Crystal prisms come in various shapes and sizes suitable for chandeliers and decorative purposes, so your material list will vary slightly depending on the look you want. That said, every successful arrangement starts with the same core toolkit.
What you need before you start
Crystal prism types to consider:
- Pendeloque prisms: Teardrop-shaped, classic chandelier style, ideal for formal living rooms and dining spaces
- Almond-shaped prisms: Wider cut that disperses light across a broader angle, great for lower ceilings
- Icicle prisms: Long, narrow forms that create dramatic vertical light streams
- Faceted bead strands: Used to connect prisms and add layered depth to arrangements
- Octagonal prisms: Multi-faceted cuts that multiply rainbow reflections in every direction
Our clear crystal prisms guide breaks down when to use each shape based on your fixture type and room size.
Hardware and hanging supplies:
| Item | Purpose | Notes |
|---|---|---|
| Brass eye pins | Attach prisms to wire or chain | Use corrosion-resistant finish |
| Nylon coated wire | Connect prisms in strands | Stronger than thread, less visible |
| Ceiling hooks | Mount swag or standalone pieces | Check load rating before use |
| Jump rings | Link prisms together | Match metal finish to fixture |
| Pliers (needlenose) | Open and close rings cleanly | Avoid scratching crystal surface |
| Measuring tape | Space prisms evenly | Critical for symmetrical layouts |
Cleaning supplies (always prep before hanging):
- Lint-free microfiber cloths
- Crystal-safe glass cleaner (no ammonia)
- Soft cotton gloves to prevent fingerprints during handling
- Small bowl of clean water for a quick rinse if needed
Pro Tip: Always inspect prisms for chips or cloudiness before purchasing in bulk. Even one dull piece in a strand draws the eye away from the overall effect. When you select chandelier crystals, prioritize lead-free optical crystal or genuine Swarovski strass for the sharpest light refraction.
Step-by-step guide to arranging crystal prisms for optimal lighting
With all materials ready, follow these steps to arrange your crystal prisms and create stunning effects.
Arranging prisms at specific distances and angles maximizes light refraction and enhances room ambiance. That principle is your north star throughout this process. Every decision you make about spacing, height, and clustering should trace back to it.
How to arrange your prisms: a step-by-step process
-
Map your light source. Stand in the room at different times of day and note where sunlight enters and where artificial light is strongest. Mark those spots lightly with painter’s tape on the floor directly below them.
-
Decide on your arrangement style. Single-row arrangements work well in narrow windows or along the edge of a chandelier. Clustered arrangements pack more visual punch in larger rooms or above a dining table where you want dramatic overhead sparkle.
-
Measure the hanging zone. For chandeliers, measure the full circumference of the frame and divide by the number of prisms you want to hang. Standard spacing runs between 6 and 12 inches between prisms, depending on prism size and room scale.
-
Prepare each prism. Thread an eye pin through the hole at the top of each prism, close the loop with pliers, and attach a jump ring. This is the link that connects the prism to your wire or chain. Handle prisms with cotton gloves to keep the surface clean.
-
Attach wire or chain strands to the fixture. Run nylon-coated wire or a decorative chain from hook point to hook point along your fixture. For window hangings, mount a tension rod or single ceiling hook and drape a strand across it.
-
Hang prisms at measured intervals. Start from the center of your strand and work outward evenly. This keeps the arrangement visually balanced and prevents one side from looking heavier than the other.
-
Test before committing. Clip prisms loosely at first rather than closing jump rings permanently. Step back, turn on the light, and observe. Rotate individual prisms slightly to see how angle changes the scatter pattern.
-
Adjust height for maximum effect. Prisms hung too high near a ceiling receive less light than those positioned lower and closer to the light source. A drop of 4 to 8 inches below the bulb is usually ideal for most residential fixtures.
-
Finalize all connections. Once satisfied with the placement, close all jump rings firmly. Tug gently on each prism to confirm the hardware is secure before leaving the arrangement unattended.
-
Document your arrangement. Take a photograph so you can recreate it exactly if you need to remove prisms for cleaning or moving.
Single-row vs. clustered arrangement comparison
| Feature | Single-row arrangement | Clustered arrangement |
|---|---|---|
| Best room size | Small to medium | Large or open-plan |
| Light scatter | Linear, focused beam | Wide, multi-directional |
| Visual complexity | Minimal and elegant | Dramatic and layered |
| Ideal location | Windows, doorways | Chandeliers, ceiling fixtures |
| Maintenance ease | Easy, fewer pieces | Moderate, more access needed |
| Cost | Lower | Higher (more prisms needed) |
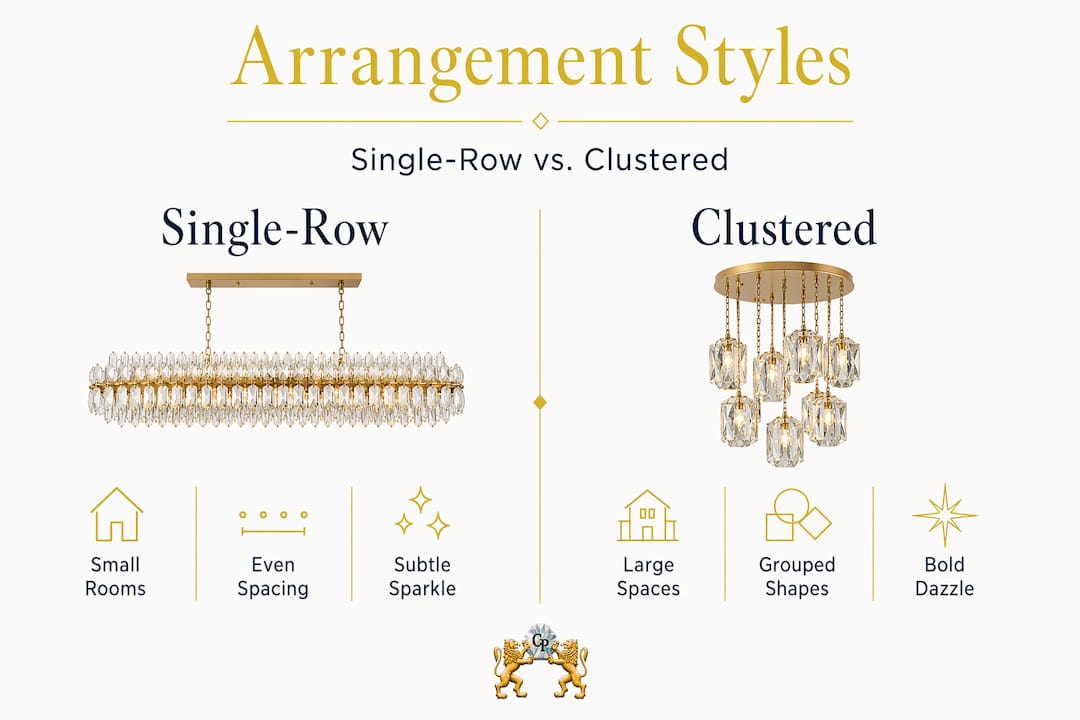
For more visual inspiration on placement styles, our crystal prism decor ideas page shows real home setups across different room types. You can also study chandelier crystal examples to see how layering different shapes creates richer effects.
Pro Tip: Test your placement during the brightest part of the day with natural light streaming in. Sunlight reveals every weak spot in your arrangement that artificial light hides. If a prism looks dull in direct sunlight, it will look even duller under a bulb at night.
Troubleshooting and common mistakes in crystal prism arrangement
Even the best plans need adjustment. Here’s how to handle common obstacles during your arrangement.
Improper placement can diminish the effect and brilliance of crystal prisms in chandeliers significantly. The good news is that most problems are easy to spot and fix once you know what to look for.
Common mistakes and how to fix them
-
Prisms hung too close together: When prisms touch or nearly touch, they block each other’s light path. The fix is simple: increase spacing by at least 2 inches between each piece and observe the difference.
-
Wrong prism orientation: Most faceted prisms have an optimal axis. If a prism is rotated sideways instead of hanging vertically, it scatters light awkwardly. Re-thread the eye pin through the correct hole if needed.
-
Dirty prisms losing brilliance: A thin layer of household dust reduces light transmission dramatically. Even prisms that look clean to the naked eye can carry invisible film that dulls reflections. Clean them with a lint-free cloth and a crystal-safe cleaner before and after any major rearrangement.
-
Using low-quality glass instead of real crystal: Standard glass beads and cheap acrylic prisms simply do not refract light the same way optical crystal does. If your arrangement looks flat even after repositioning, the material itself may be the problem.
-
Hanging prisms too far from the light source: Distance matters more than most guides admit. A prism hung 18 inches below a bulb produces a fraction of the rainbow effect compared to one hanging 5 to 6 inches away. Move prisms closer and measure the improvement.
Safety note: Never stand on unstable furniture to reach a chandelier or high fixture. Use a proper step ladder rated for your weight, and always have someone nearby when working near ceiling fixtures. Crystal prisms are surprisingly heavy in large quantities, so check that ceiling hooks and mounting hardware are rated for the total load before installation.
When it comes to transforming your home with crystal prisms, the biggest upgrade often isn’t adding more prisms but correcting the placement of the ones already there. Small adjustments in angle and height produce outsized improvements in the final effect.
For spaces like hallways and foyers, the entryway prism tips we’ve put together address the specific challenges of narrow, often low-light corridors where placement precision matters even more.
Pro Tip: Clean your crystal prisms every 4 to 6 weeks in high-traffic areas like kitchens or dining rooms, and every 8 to 10 weeks in bedrooms or living rooms. A quick wipe takes under 10 minutes and keeps every prism performing at full brilliance year-round.
Verifying results and maintaining crystal prisms
After troubleshooting, ensure your arrangement shines by following these best practices for verification and maintenance.
Regular maintenance and proper placement ensure continued light enhancement for the long term. Setting your arrangement and forgetting it is the fastest way to watch the effect slowly fade over months. A consistent verification and maintenance routine keeps everything performing the way it did on day one.
Verification checklist: evaluating your lighting effect
Before calling your arrangement complete, run through this checklist:
- Rainbow scatter test: At peak sunlight or with lights on at full brightness, confirm that rainbow reflections appear on at least two or three walls or surfaces in the room
- Coverage evenness check: Walk the full perimeter of the room and confirm no large dark patches exist where prisms should be reaching
- Symmetry review: Photograph the fixture from directly below to spot any irregular spacing that’s difficult to see from eye level
- Hardware inspection: Check every jump ring and eye pin connection for gaps or stress points that could loosen over time
- Prism clarity check: Look at each prism against the light. Cloudy or yellowed crystals need either cleaning or replacement
Maintenance schedule for long-term brilliance
Dust and airborne particles are the top enemies of crystal brilliance. In rooms with fireplaces, candles, or cooking nearby, grease and soot also accumulate on crystal surfaces faster than you’d expect. A simple wipe-down on a consistent schedule prevents buildup from hardening into residue that’s difficult to remove later.

For deeper cleaning, remove prisms from the fixture, place them in a bowl of warm water with a small amount of mild dish soap, rinse thoroughly, and dry with a lint-free cloth. Never use paper towels, which scratch optical surfaces. Lay prisms on a soft cloth to air dry before rehanging.
The light enhancement payoff is real. Real crystal prisms can increase perceived brightness by up to 40% compared to standard glass prisms. That’s not a marginal improvement. It’s the difference between a room that feels alive and one that just feels lit.
As seasons change, the angle of natural light entering your windows shifts. What works brilliantly in summer may need adjustment in winter when sunlight enters at a lower, more oblique angle. Revisit your crystal prism types and consider whether a shape change for seasonal placements would enhance your results through the year.
What most crystal prism guides overlook
Most guides on this topic spend 80% of their space listing products and 20% on actual placement advice. That ratio is backwards. After decades of helping homeowners and decorators achieve genuinely stunning lighting results, we’ve seen one pattern repeat itself constantly: the biggest wins come from experimentation, not from following a fixed template.
Here’s the overlooked truth about crystal prism arrangement: your room is unique. The ceiling height, the wall color, the direction windows face, the finish on your floors, the type of bulb in your fixture. Every one of these variables changes how light behaves when it hits a crystal surface. No guide can account for all of them in advance, including this one.
What truly separates a good arrangement from a spectacular one is the willingness to test, adjust, and test again. Move a single prism three inches lower and you might get double the rainbow scatter. Rotate a cluster by 15 degrees and an entire wall comes alive that was dark before. These are adjustments no specification chart will tell you to make because they depend entirely on your specific space at a specific time of day.
The guides that focus only on prism selection insights and hardware checklists miss this point entirely. Quality materials matter, yes. But they’re only the starting point. The arrangement itself is where the art lives.
Our strong advice: repeat your daylight test after every single adjustment, not just at the beginning. The morning light test and the afternoon light test often reveal completely different problems and opportunities. Treat your arrangement as a living configuration that improves over time rather than a one-time installation.
Shop premium crystal prisms for your next arrangement
Ready to brighten up your space? Discover premium options and get expert guidance below.
Every arrangement starts with the right materials, and the quality of your prisms determines the ceiling on your results. Our selection at Crystal Place includes Swarovski strass crystals, precision-cut pendeloques, faceted bead strands, and specialty shapes suited for every room type and lighting goal. We’ve been sourcing directly from authentic crystal brands since 1992, so you’re getting materials that professionals and serious decorators trust.
Whether you’re refreshing a dining room chandelier, creating a window suncatcher display, or designing a full entryway installation, we carry every size, shape, and hardware accessory you need. Orders over $22 ship free within the USA, and our team is available to help you match the right prism style to your specific fixture and room. Browse the full collection today and start building the arrangement your space deserves.
Frequently asked questions
What is the best type of crystal prism for home lighting?
Faceted prisms provide optimal brilliance for home lighting, and high-clarity optical crystal or Swarovski strass outperforms standard glass in every measurable way.
How far apart should crystal prisms be arranged?
Arrangement patterns vary and spacing impacts lighting results significantly; 6 to 12 inches apart is the standard range for chandeliers and clustered arrangements in most residential rooms.
How do I clean crystal prisms to maintain their brilliance?
Wipe each prism with a lint-free microfiber cloth and a crystal-safe glass cleaner; regular cleaning maintains maximum light enhancement and prevents dulling from household dust and residue.
Can crystal prisms be used in entryways or other rooms besides chandeliers?
Yes, crystal prisms are effective in various spaces beyond chandeliers, including entryways, bay windows, living rooms, and any area that receives sufficient natural or artificial light.
Can crystal prisms really boost room brightness?
Real crystal prisms can increase perceived brightness by up to 40% compared to standard glass prisms, making them a genuinely impactful upgrade for any room’s lighting.
Recommended
- Types of crystal prisms for stunning home lighting in 2026 – CrystalPlace
- 12 Hanging Crystal Prism Decor Ideas That Glow – CrystalPlace
- Crystal prisms: transform your home with vibrant light – CrystalPlace
- Crystal prism selection guide: elevate your lighting – CrystalPlace